How to Sew a Button-Front Pencil Skirt from Old Jeans!

 Got a pair of jeans you love but don't wear anymore? Perhaps they're too tight in the legs, or you just fancy a change? Don't toss them! Give them a chic new life by transforming them into a trendy and versatile button-front pencil skirt, just like the one pictured above. This upcycling project is not only fantastic for the environment but also allows you to create a custom-fit skirt with that perfectly worn-in denim feel.


This tutorial will guide you through the process of deconstructing your jeans and reassembling them into a flattering, A-line or straight pencil skirt with a stylish button-front closure.

Why You'll Love This Project:

  • Eco-Friendly: Reduces textile waste by giving old jeans a stylish second life.

  • Budget-Friendly: Creates a brand-new garment without buying new fabric.

  • Custom Fit: Utilizes the perfect fit of your jeans' waistband and hip area.

  • Unique Style: Your skirt will have that authentic denim look with cool seam details.

  • Beginner-Friendly: A relatively straightforward project for those with basic sewing skills.


What You'll Need:

  • 1 Pair of Adult Denim Jeans: Choose a pair that fits comfortably around your waist and hips, as this will form the top part of your skirt. Straight-leg or bootcut jeans often provide more fabric for the skirt panels.

  • Sewing Machine: Essential! Make sure you have a denim needle installed – it's crucial for stitching through thick denim seams.

  • Strong Polyester Thread: Matching your denim for invisible seams, or a contrasting color (like gold or orange) for topstitching that classic denim look.

  • Fabric Scissors: Sharp and sturdy for cutting denim.

  • Measuring Tape or Ruler.

  • Fabric Chalk or Washable Marker.

  • Pins.

  • Iron and Ironing Board.

  • Seam Ripper: Your best friend for this project!

  • Buttons: 4-7 buttons, depending on the length of your skirt and desired spacing. Consider metal jean buttons or shank buttons for an authentic look.

  • Optional: Lightweight fusible interfacing for the button placket.

Step-by-Step Pattern & Sewing Guide:

Step 1: Deconstruct Your Jeans

  1. Lay your jeans flat: Smooth them out on a large work surface.

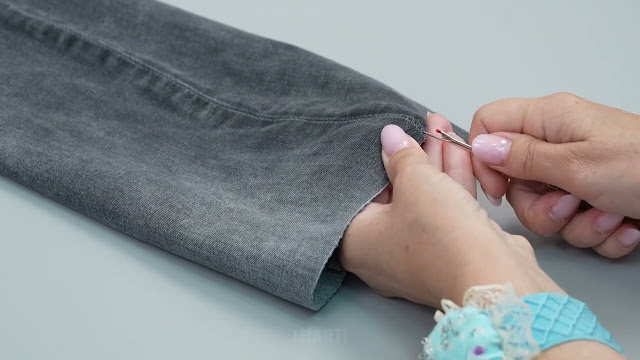
  2. Open the inseams: Using your seam ripper, carefully unpick the inseams (the inner leg seams) from the crotch all the way down to the hem of both legs. This will allow you to flatten out each pant leg.

  3. Open the crotch seam (front and back): Carefully unpick the curved crotch seam on both the front and back of the jeans. Open it up completely so that the front and back of the jeans are now separate pieces of fabric. Be careful not to unpick the zipper fly or the waistband area.

  4. Press flat: Press all the deconstructed denim pieces flat to remove any creases.


Step 2: Create the Front Skirt Panel (Button Placket)

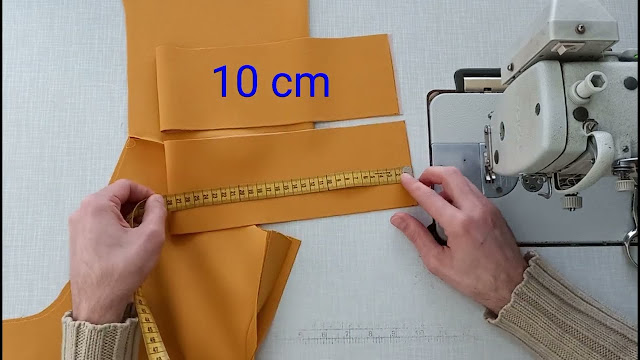
  1. Overlap and Pin: Take the two front pieces of your jeans. Overlap the raw, curved edges of what was the crotch area. Pin them together, aiming to create a straight line down the center front. This new seam will form your button placket. The amount of overlap will determine how wide your placket is – aim for enough to accommodate your buttons (usually 1.5 to 2 inches / 3.8-5 cm for the total finished placket width).

    • Tip: If your jeans have a zipper fly, you can unpick the stitches that hold the zipper in place on one side, allowing the fabric to lay flatter for the overlap. You will not be reusing the zipper.

  2. Stitch the Placket Base: Stitch this overlapped seam securely down the new center front. You can use a double line of stitching for strength. Trim any excess fabric from underneath.

  3. Prepare for Buttons: If desired, you can add a strip of fusible interfacing to the wrong side of the newly formed placket area for added stability for your buttonholes.

  4. Mark Buttonholes: Mark the placement for your buttonholes down the center front placket. Start from the existing waistband button, or just below it. Space them evenly down the length of the skirt.

  5. Sew Buttonholes: Use your sewing machine's buttonhole foot to create the buttonholes. Carefully open them with a seam ripper.


Step 3: Create the Back Skirt Panel

  1. Overlap and Stitch: Take the two back pieces of your jeans. Overlap the raw, curved edges of what was the back crotch seam. Pin them together to create a straight, continuous seam down the center back.

  2. Stitch: Stitch this new seam securely down the center back. Trim excess fabric and press the seam open or to one side.

  3. Topstitch (Optional but Recommended): For a professional, ready-to-wear look, topstitch on either side of your newly sewn front and back center seams. This mimics the original denim flat-felled seams and adds durability.


Step 4: Determine Skirt Length & Hem

  1. Try on the skirt base: Put on the newly formed skirt.

  2. Mark desired length: Stand in front of a mirror and mark your desired skirt length with chalk. Remember to add about 1 to 2 inches (2.5-5 cm) for your hem allowance.

  3. Trim: Take the skirt off and carefully trim the bottom edge straight across at your marked line.

  4. Hem the skirt: Fold the raw hem edge up by 1/2 inch (1.25 cm), press. Then fold up again by another 1 inch (2.5 cm) and press. Stitch the hem in place, using a double row of topstitching for a classic denim hem.

Step 5: Attach Buttons

  1. Mark Button Placement: Place the side of the skirt with the buttonholes over the other front side, aligning the buttonholes. Use your fabric marker to mark the exact placement of each button through the buttonholes.

  2. Sew Buttons: Stitch your buttons securely in place on the marked spots.


Your Stylish New Denim Skirt!

And there you have it! A chic and comfortable button-front pencil skirt, beautifully upcycled from a pair of your old jeans. This skirt is incredibly versatile – perfect for pairing with t-shirts, sweaters, or blouses for a casual yet put-together look.

We'd love to see your amazing denim transformations! Share your new skirts with us in the comments below or tag us on social media! Happy sewing!

From Pants to Polish: How to Sew a Stylish Vest from Old Trousers

 Looking for a unique way to upcycle an old pair of trousers? Don't let those perfectly good pant legs go to waste! With a bit of creative cutting and some sewing magic, you can transform them into a chic and tailored vest, just like the one pictured above. This project is not only sustainable but also a fantastic way to add a personalized touch to your wardrobe without buying new fabric.


This tutorial will guide you through the process of creating a V-neck, button-front vest using the fabric from an old pair of pants. The light blue denim-like fabric in the image is perfect for this, but imagine the possibilities with different materials!

Why You'll Love This Project:

  • Eco-Friendly: Gives new life to garments, reducing textile waste.

  • Budget-Friendly: Creates a new top without the cost of new fabric.

  • Unique Style: Your vest will be one-of-a-kind and perfectly fitted.

  • Versatile: Great for layering over shirts, blouses, or even worn on its own.

  • Intermediate Challenge: A good project to practice tailored techniques like darts and buttonholes.


What You'll Need:

  • 1 Pair of Old Trousers or Jeans: Choose a pair made from a fabric that has some structure (like denim, twill, linen blend, or suiting fabric). The pant legs need to be wide enough to accommodate your bust and waist measurements.

  • Your Best-Fitting Top or Vest: This will serve as your pattern block. A close-fitting t-shirt or tank top, or even an existing vest, is ideal.

  • Sewing Machine: With a suitable needle for your fabric (e.g., denim needle for denim/twill, universal for lighter fabrics).

  • Matching Polyester Thread.

  • Fabric Scissors.

  • Measuring Tape or Ruler.

  • Fabric Chalk or Washable Marker.

  • Pins.

  • Iron and Ironing Board.

  • Seam Ripper.

  • Interfacing: Lightweight to medium-weight fusible interfacing for the front facings and collar/lapel area.

  • Buttons: 3-5 buttons, depending on your desired look and vest length.

  • Optional: Lining fabric (if you want a fully lined vest).

Step-by-Step Pattern & Sewing Guide:

Step 1: Deconstruct Your Trousers

  • Lay your trousers flat.

  • Cut off the legs: Cut off both pant legs at a point well above the knee, ensuring you have enough fabric for the length of your vest. You'll primarily be using the fabric from the pant legs for the main body of the vest.

  • Open the leg seams: Use your seam ripper to carefully unpick the inner and outer leg seams of both pant legs. Press the fabric pieces flat. You should now have two large, relatively rectangular pieces of fabric from each leg.


Step 2: Create Your Vest Pattern Pieces

This is where your well-fitting top or vest comes in handy!

  • Front Vest Piece (Cut 2 mirrored):

    • Lay one of your flattened pant leg pieces (right side up) onto your ironing board or cutting mat.

    • Fold your well-fitting top in half lengthwise. Lay it flat on your denim piece, aligning the shoulder seam with a straight edge of your fabric if possible.

    • Trace around the front half of your top, adjusting the neckline to a V-neck shape (as seen in the image).

    • Extend the bottom of the pattern piece to your desired vest length, adding a slight curve if you want a classic vest point at the front hem. Add 1/2 inch (1.25 cm) seam allowance all around.

    • Crucially: You'll need to account for the center front opening for buttons. Add an additional 1 to 1.5 inches (2.5-3.8 cm) beyond the center front line for the button placket/facing.

    • Cut out one piece. Flip your pattern over (or the fabric) and cut a second mirrored piece for the other front side.

  • Back Vest Piece (Cut 1 on fold):

    • Fold another pant leg piece in half lengthwise.

    • Lay your well-fitting top onto the folded fabric, aligning the center back of the top with the fold of your fabric.

    • Trace around the back half of your top, extending the length to match the front piece. Add 1/2 inch (1.25 cm) seam allowance all around.

    • Cut out the piece on the fold.

  • Facings (Optional but recommended for a clean finish):

    • Cut separate facing pieces for the front (V-neckline and button placket) and back (neckline). These should be about 2-3 inches (5-7.5 cm) wide, mirroring the shape of the garment edges.

    • Alternatively, as seen in the image, the vest might be partially lined or have self-facings cut from the same fabric.


Step 3: Add Darts (If needed)

  • Hold your front vest pieces up to your body. Mark where bust darts (and/or waist darts if desired) would naturally fall to give the vest a tailored, fitted shape.

  • Draw these dart lines onto your fabric with chalk.

Step 4: Interfacing

  • Cut fusible interfacing for your front facings (or the extended placket area if not using separate facings) and for the back neckline facing.

  • Apply the interfacing to the wrong side of your fabric pieces following the manufacturer's instructions. This will add structure and stability.

Step 5: Assemble the Vest

  1. Sew Darts: Fold and sew any darts you marked on your front and back vest pieces. Press the darts towards the side seams (or down for bust darts).

  2. Shoulder Seams: Place the front vest pieces and the back vest piece right sides together, aligning the shoulder seams. Pin and stitch. Press seams open.

  3. Side Seams: Align the side seams of the front and back vest pieces, right sides together. Pin and stitch. Press seams open.

  4. Prepare Front Opening/Facings:

    • If you cut an extended placket for your front opening, fold it to the wrong side along the center front line, press. Then fold again to create a clean finish and press. Topstitch in place.

    • If you cut separate facings, sew them to the raw edges of the V-neckline and front opening, right sides together. Trim seams, clip curves, and turn to the inside. Press well and topstitch.

  5. Finish Neckline and Armholes:

    • For the neckline (if not using separate facing): Fold the raw edge under twice (1/4 inch then 1/4 inch) and topstitch, or use bias binding for a clean finish.

    • For the armholes: Finish the raw edges by folding under twice and topstitching, or by applying bias binding.


Step 6: Hem the Vest

  • Try on the vest to confirm your desired length.

  • Fold the raw bottom edge of the vest up by 1/2 inch (1.25 cm), press. Fold up again by another 1 inch (2.5 cm) and press. Stitch in place.

Step 7: Buttons and Buttonholes

  1. Mark Buttonholes: On the front right side of your vest (for women's wear; reverse for men's), mark the placement for your buttons and buttonholes. Usually, the top buttonhole is near the top of the V-neck, and evenly spaced below.

  2. Sew Buttonholes: Use your sewing machine's buttonhole foot to create the buttonholes. Carefully open them with a seam ripper.

  3. Attach Buttons: Place the left front vest side over the right side, aligning the buttonholes. Mark the exact placement of each button through the buttonholes. Stitch your buttons securely in place.


Your New Stylish Vest!

And there you have it! A fabulous, tailored vest made from an old pair of trousers. This is a perfect layering piece that adds a touch of sophistication to any outfit. Experiment with different fabrics from old garments to create a whole collection!

Share your amazing vest transformations with us in the comments or on social media! Happy sewing!

From Jeans to Chic: How to Sew a Stylish Panelled Denim Maxi Skirt

 Have a pair of jeans that you love the waist and hip fit of, but the style of the legs just isn't working for you anymore? Don't let them go to waste! With a few simple steps, you can transform them into a trendy and comfortable panelled denim maxi skirt, just like the one in the image above. This upcycling project is not only sustainable but also allows you to create a custom-fit skirt that's uniquely yours.


This tutorial focuses on creating a skirt with a flattering A-line or straight silhouette using the existing denim panels of your jeans.

Why You'll Love This Project:

  • Eco-Friendly: Gives new life to old denim, reducing textile waste.

  • Cost-Effective: No need to buy new fabric for a stylish skirt.

  • Custom Fit: Utilizes the perfect fit of your jeans' waistband and hips.

  • Unique Style: Creates a one-of-a-kind denim skirt with interesting seam details.

  • Beginner-Friendly: A relatively straightforward project for those with basic sewing skills.


What You'll Need:

  • 1 Pair of Adult Denim Jeans: Choose a pair that fits well around your waist and hips, as this will form the top part of your skirt. A straight leg or bootcut style might give you more fabric to work with for the lower panels.

  • Sewing Machine: With a denim needle (essential for stitching through thick layers!).

  • Strong Polyester Thread: Matching your denim or a contrasting color for topstitching.

  • Fabric Scissors: Sharp ones for denim.

  • Measuring Tape or Ruler.

  • Fabric Chalk or Washable Marker.

  • Pins.

  • Iron and Ironing Board.

  • Seam Ripper.

  • Optional: Extra denim scraps if you need to widen the skirt more than the original jeans allow, or if you want contrasting side panels.

Step-by-Step Pattern & Sewing Guide:

Step 1: Prepare Your Jeans

  • Lay your jeans flat and smooth them out.

  • Cut the inner leg seams: Using your seam ripper, carefully unpick the inseams (the inner leg seams) from the crotch all the way down to the hem. This will allow you to open up the jeans into two separate legs, and then into front and back panels.

  • Open the crotch seam: Carefully unpick the crotch seam at both the front and back. You want to open it just enough so that you can flatten out the front and back pieces of the jeans without a bulge. Do not unpick the zipper fly area if you want to keep the original jeans closure.

Step 2: Reshape the Front and Back Skirt Panels

  • Lay the deconstructed jeans flat. You should now have two large, somewhat oddly shaped pieces of denim (front and back of the jeans).

  • Create the front seam: Overlap the two raw edges of the front crotch area. Pin them together, aiming to create a straight, continuous seam down the center front, replacing the original curved crotch. Stitch this new seam securely with a strong straight stitch. Trim excess fabric and press the seam open or to one side.

  • Create the back seam: Repeat the process for the back panels, stitching a new straight seam down the center back. Press.

  • Topstitch (optional but recommended): For a professional, ready-to-wear look, topstitch on either side of your newly sewn front and back center seams. This mimics the original denim flat-felled seams and adds durability.


Step 3: Determine Your Skirt Length & Hem

  • Try on your newly formed skirt base. It should now resemble a basic tube skirt, with the original waistband and pockets intact.

  • Decide on your desired maxi skirt length. Mark it with chalk. Remember to add about 1-2 inches (2.5-5 cm) for your hem allowance.

  • Trim the bottom raw edge of the skirt straight across.

  • Create the hem: Fold the raw edge up by 1/2 inch (1.25 cm), press, then fold up again by another 1 inch (2.5 cm) and press. Stitch in place. You can use a double row of topstitching for a classic denim hem.


Step 4: Add Side Slits (Optional, as seen in the image)

  • The inspiration image shows subtle side slits. If you want these:

    • Mark where you want your slits to start on the side seams (usually above the knee or mid-thigh).

    • From this mark down to the hem, open the existing side seam of the jeans using your seam ripper.

    • Finish the raw edges of the slit. You can fold them under twice (1/4 inch then 1/4 inch) and topstitch, or use a serger for a clean finish. This makes the slits durable and neat.

Step 5: Finishing Touches

  • Give your entire new skirt a final press to ensure all seams lie flat and look crisp.

  • Snip any loose threads.

  • Try on your new panelled denim maxi skirt!


Rock Your Refashioned Denim Skirt!

You've done it! You've successfully transformed a pair of old jeans into a stylish and unique panelled denim maxi skirt. This versatile piece is perfect for everyday wear, easy to dress up or down, and a fantastic way to extend the life of your favorite denim.

Share your finished skirts with us in the comments below or tag us on social media! Happy sewing!

Jeans to Dress: How to Upcycle Denim into a Stylish Overall Dress

 Got a favorite pair of jeans that are a bit worn out, or maybe just don't fit quite right anymore? Don't let them gather dust in the back of your closet! With a little creativity and some basic sewing skills, you can transform them into an adorable and practical denim overall dress. This upcycling project is not only sustainable but also a fantastic way to create a unique piece for your wardrobe.


In this tutorial, we'll walk you through the steps to convert a pair of adult jeans into a cute denim overall dress, similar to the one shown above. Get ready to give your old denim a brand new life!

Why You'll Love This Project:

  • Eco-Conscious: Gives old jeans a second chance, reducing textile waste.

  • Budget-Friendly: Creates a new garment without buying new fabric.

  • Unique Style: Your overall dress will be one-of-a-kind.

  • Versatile: Perfect for layering over t-shirts, turtlenecks, or sweaters.

  • Beginner-Friendly: A straightforward project for those comfortable with a sewing machine.


What You'll Need:

  • 1 Pair of Adult Denim Jeans: Choose a pair that is a comfortable fit around your hips, as this will become the base of your skirt. A larger size might give you more room for a looser fit.

  • Sewing Machine: Equipped with a denim needle.

  • Strong Polyester Thread: Matching your denim or a contrasting color for topstitching.

  • Fabric Scissors: Sharp!

  • Measuring Tape or Ruler.

  • Fabric Chalk or Washable Marker.

  • Pins.

  • Iron and Ironing Board.

  • Seam Ripper.

  • Optional: 2 Overall buckles/clips and buttons for the straps (or you can create simple buttonholes and attach regular buttons).

Step-by-Step Pattern & Sewing Guide:

Step 1: Prepare Your Jeans

  • Lay your jeans flat.

  • Cut the legs: Carefully cut off both jean legs just below the crotch seam. You want to essentially create a "skirt" from the top portion of the jeans. Try to cut straight across, or slightly curved if you want a subtle A-line.

  • Open the inner leg seams (optional but recommended for a smoother skirt): Use your seam ripper to carefully unpick the inseams (the inner leg seams) from where you cut up to the original crotch seam. This will allow you to flatten out the front and back panels more effectively.

  • Flatten the crotch curve: With the inseams opened, you can now trim and reshape the excess fabric around the former crotch area to create a smooth, continuous line for your skirt. Pin the front and back seams together to prepare for sewing.

  • Sew the center seams: With right sides together, stitch down the front and back opened seams to create your skirt base. Press these new seams open for a flatter finish.


Step 2: Determine Your Skirt Length & Hem

  • Try on the newly formed skirt base.

  • Decide on your desired overall dress length. Mark it with chalk. Remember to add about 1-2 inches (2.5-5 cm) for your hem allowance.

  • Trim the bottom edge of the skirt straight across.

  • Create a simple hem: Fold the raw edge up by 1/2 inch (1.25 cm), press, then fold up again by another 1 inch (2.5 cm) and press. Stitch in place.

Step 3: Create the Bib (Front Panel)

  • From one of the jean legs you cut off earlier, find the widest, flattest part.

  • Measure your bib: Measure across the front of your chest where you want the bib to sit. This will be the width of your bib. For the height, measure from just above your waistline up to where you want the top of the bib to reach (e.g., mid-chest). Add seam allowances (1/2 inch or 1.25 cm all around) to these measurements.

  • Cut the bib: Draw your rectangular bib shape onto the denim leg piece and cut it out. You can slightly curve the top corners if you prefer.

  • Finish the bib edges: Fold under 1/2 inch (1.25 cm) around all four edges of the bib and press. Fold under again for a neat finish (or use a serger if you have one). Topstitch along the folded edges.


Step 4: Add Pockets (Optional)

  • If your jeans have back pockets, you can carefully remove them with a seam ripper.

  • Decide where you want to place them on your new dress. The inspiration image shows two patch pockets near the hip area.

  • Pin the pockets in place and stitch them down securely around the three raw edges, leaving the top open.

Step 5: Create the Straps

  • From the remaining denim fabric (e.g., the other jean leg or leftover scraps), cut two long strips for your straps.

  • Strap Dimensions: A good starting point is about 2 inches (5 cm) wide and 20-25 inches (50-63 cm) long, depending on your height and desired strap length. You can always trim them shorter later.

  • Construct the straps: Fold each strip in half lengthwise, right sides together. Stitch along the raw edge. Turn the straps right side out (a loop turner helps here) and press flat. Topstitch along both long edges for a professional finish and added durability.

  • Attach buckles (optional): If using overall buckles, thread one end of each strap through the buckle and fold it back on itself. Stitch securely.

Step 6: Attach the Bib and Straps to the Skirt

  • Attach the bib: Place the finished bib onto the front of your denim skirt, centering it both horizontally and vertically, so its bottom edge overlaps the waist of the skirt base by about 1/2 to 1 inch. Pin it securely. Topstitch the bib in place along its bottom edge and up the sides.

  • Attach the straps to the back: On the back of the skirt, try on the dress or hold it up to yourself to determine the best placement for the strap ends. They usually attach to the top edge of the back waistband, about 3-4 inches apart, or directly above the back pockets if you kept them. Stitch them securely to the back waistband.

  • Attach straps to the front (with buttons or buttonholes):

    • If using buckles: Create two buttonholes on the top front corners of your bib, or sew two regular buttons in place that the buckle "prong" can hook onto. Test for length.

    • If using regular buttons: Create buttonholes on the ends of your straps. Try on the dress and mark where the buttons should be sewn onto the bib for a comfortable fit. Stitch the buttons in place.

Step 7: Final Touches

  • Give your new overall dress a final press.

  • Snip any loose threads.

  • Try it on and adjust the strap length as needed!


Your New Favorite Denim Piece!

Congratulations! You've successfully transformed a pair of old jeans into a fabulous and stylish overall dress. This is a perfect casual piece that you can wear year-round. Experiment with different tops underneath to change up your look.

We'd love to see your finished creations! Share your overall dresses in the comments below or tag us on social media! Happy sewing!

How to Sew a Stylish Circle Skirt from Old Jeans

 Are your old jeans piling up? Don't toss them! Give them a new life and your wardrobe a fresh, eco-friendly update by transforming them into a chic and comfortable denim circle skirt. This DIY project is not only satisfying but also a great way to express your personal style while being kind to the planet.

In this tutorial, we'll guide you through the process of creating a beautiful, full denim skirt, similar to the one pictured above. You'll be surprised at how easy it is to achieve a professional-looking result with just a few basic sewing skills.


Why You'll Love This Project:

  • Eco-Friendly: Reduces textile waste by upcycling old garments.

  • Unique Style: Creates a one-of-a-kind piece that reflects your creativity.

  • Cost-Effective: Saves money on new fabric.

  • Comfortable: A circle skirt offers wonderful movement and comfort.

  • Beginner-Friendly: While it looks impressive, the construction is quite straightforward.


What You'll Need:

  • Several pairs of old denim jeans: The more jeans you have, the fuller and more varied your skirt can be. Aim for at least 4-6 pairs, varying in washes if you like!

  • Sewing machine: With a denim needle (essential for thick seams!).

  • Strong polyester thread: Matching or contrasting, depending on your preference.

  • Fabric scissors: Sharp ones for denim.

  • Measuring tape or ruler.

  • Fabric chalk or washable marker.

  • Pins.

  • Iron and ironing board.

  • Seam ripper (for taking apart jeans).

  • Optional: Skirt zipper, button, and waistband interfacing.

Step-by-Step Pattern & Sewing Guide:

Step 1: Deconstruct Your Denim

This is the most time-consuming but crucial step!

  • Lay your jeans flat and use your seam ripper to carefully open up the inseams (inner leg seams) and outer leg seams of all your jeans.

  • Cut off the top portion (waistband, pockets, zipper fly) and the bottom hems of each leg. You want to end up with flat pieces of denim fabric.

  • Iron all your denim pieces flat to remove creases.


Step 2: Determine Your Skirt Dimensions

For a full circle skirt, we need a few key measurements:

  1. Your Waist Measurement: Measure around the narrowest part of your natural waist. Add 1-2 inches for ease, and consider if you want a snug or slightly looser fit. Let's call this W.

  2. Desired Skirt Length: Measure from your natural waist down to where you want the hem to fall (e.g., knee-length, midi-length). Let's call this L.

Now, for the calculations:

  • Waist Radius (R1): This is the radius of the inner circle of your skirt. The formula for the circumference of a circle is C = 2Ï€r. Since your waist measurement W will be the circumference of your inner circle, R1 = W / (2Ï€).

    • Example: If your waist is 30 inches, R1 = 30 / (2 * 3.14159) ≈ 4.77 inches.

  • Hem Radius (R2): This is the radius of the outer circle of your skirt. R2 = R1 + L.

    • Example: If R1 is 4.77 inches and your desired length L is 25 inches, R2 = 4.77 + 25 = 29.77 inches.


Step 3: Cut Your Denim Panels

This skirt is made from multiple wedge-shaped panels, similar to the fan-like pattern in the inspiration image.

  • Panel Width at Waist: Decide how many panels you want. More panels mean more seams, but also more opportunity to mix denim washes. The inspiration image looks like it has about 16-20 panels. Let's say you want 16 panels.

    • The waist circumference of each panel at the top will be W / Number of Panels.

    • Example: If W is 30 inches and you want 16 panels, 30 / 16 = 1.875 inches. You'll need to add seam allowances to this!

  • Panel Width at Hem: Calculate the circumference of the outer circle (2 * Ï€ * R2). Then divide this by your number of panels. Add seam allowances.

Instead of individual calculations, a simpler approach for the wedge:

  • Create a template: On a large piece of paper (or directly on your denim if you're confident), draw a quarter-circle template.

    • From one corner of the paper, measure out R1 along two perpendicular edges. Connect these points with a curved line. This is your waistline.

    • From the same corner, measure out R2 along the same two perpendicular edges. Connect these points with a curved line. This is your hemline.

    • This quarter-circle represents one-fourth of your skirt. You'll cut four of these if your denim pieces are large enough, or more if you're piecing smaller wedges.

  • Or, the "fan" method (as shown in the image):

    • You'll be cutting long, slightly tapered strips. The bottom will be wider than the top.

    • Cut a paper pattern piece: Measure your desired skirt length (L). At the top, make it half of your calculated panel width at waist (plus seam allowance for both sides). At the bottom, make it half of your calculated panel width at hem (plus seam allowance for both sides). Draw a straight line from top to bottom on one side, and then a slightly angled line on the other side to create the taper. Remember, you're cutting each panel on a fold, or you're cutting two symmetrical pieces per panel.

    • Simpler still: Cut several rectangular strips of denim. For a 25-inch long skirt, cut strips about 27-28 inches long (to allow for hem and waist seams). The width of these strips will vary. The key is to gradually taper them.

      • The top (waist) of each strip will be (W / Number of Panels) + 1 inch seam allowance.

      • The bottom (hem) of each strip will be (Circumference of Hem / Number of Panels) + 1 inch seam allowance.

      • Draw these lines, and then draw straight lines connecting the top width to the bottom width. Cut these out. You'll need as many of these panels as you decided on.


Step 4: Assemble Your Skirt Panels

  • Take two denim panels and place them right sides together. Pin along one of the long, tapered edges.

  • Sew them together using a sturdy straight stitch with a 1/2 inch (1.25 cm) seam allowance.

  • Press the seams open or to one side, depending on what gives a flatter finish with your denim thickness.

  • Continue adding panels in the same way until you have sewn all your pieces together, forming a large circle.

  • Leave one seam open for the zipper if you are adding one. If you're using an elastic waistband or simply want to pull it on, you can close the entire circle.

Step 5: Attach the Waistband

  • You can create a simple folded waistband, or use one of the original denim waistbands from your old jeans if it fits!

  • If making a new one: Measure your exact waist circumference (without ease if you want it snug, or with a little ease). Cut a strip of denim (or use a waistband from an old pair of jeans) that is this length plus 1 inch for seam allowances, and about 3-4 inches wide (this will be folded in half).

  • Attach the waistband to the raw edge of your skirt's waistline, right sides together. If you're installing a zipper, this is where you'll incorporate it into that open seam.

Step 6: Insert Zipper (if applicable)

  • If you left a seam open for a zipper, install a standard dress zipper or a denim-appropriate zipper. There are many great tutorials online for zipper insertion!

Step 7: Hem the Skirt

  • Try on your skirt and determine the perfect length.

  • Fold the raw hem edge up by 1/2 inch, press, then fold up again by another 1/2 inch to 1 inch (or your desired hem width).

  • Topstitch the hem in place using a strong thread, preferably a contrasting color if you want that classic denim look.

Step 8: Final Touches

  • Give your new skirt a final press.

  • If you used an original waistband, you can reattach the button and buttonhole. Otherwise, add a hook and eye closure or another button if desired.

  • Consider adding belt loops from your old jeans for a more authentic denim feel.


Rock Your Upcycled Creation!

And there you have it! A unique, stylish, and sustainable denim circle skirt made entirely from your previously unloved jeans. This skirt is incredibly versatile – dress it up with a blouse and heels, or keep it casual with a t-shirt and sneakers.

Share your finished skirts with us in the comments or on social media! Happy sewing!

How to transform a mens shirt into a style skirt easily


Video tutorial


Diagonal Line Zipper Pocket" Shoulder Bag/made of old jeans

  Video tutorial