
Hey crafty crew! Ever look at a pair of well-loved, slightly-too-worn jeans and wonder what else they could be? Well, today we're turning that wonder into a gorgeous reality! We're going to transform those denim discards into an absolutely stunning, unique shoulder bag adorned with beautiful denim flowers. Get ready to upcycle, sew, and create a statement piece that's not only stylish but also eco-friendly.
This project is perfect for confident beginners and intermediate sewers, and the best part? You're giving new life to old favorites!

What You'll Need:
1 pair of old denim jeans: The bigger the jeans, the more fabric you'll have. Aim for a pair with a good amount of unbroken fabric on the legs.
Fabric for lining (optional but recommended): Cotton, broadcloth, or even an old bedsheet will work. About 1/2 to 3/4 yard, depending on your bag size.
Fusible interfacing (optional, but good for structure): Medium-weight, about 1/2 yard.
Pearls or beads: For the center of your denim flowers. You'll need about 30-50, depending on how many flowers you make and how large your bag is.
Sewing machine and basic sewing supplies: Thread (denim-colored or contrasting), scissors, pins, ruler/measuring tape, fabric marker or chalk, hand-sewing needle.
Optional: Rivets, D-rings, magnetic snap closure, zipper for pocket.
Let's Get Started! The Deconstruction & Planning
Step 1: Deconstruct Your Jeans Lay your jeans flat. We're going to harvest the usable fabric.
Cut off the legs just below the crotch seam.
Slit open the inseam and the outseam of each leg. Press them flat. You should now have two large rectangular-ish pieces of denim.
If you want to use the waistband for your strap (a great option!), carefully unpick the waistband from the rest of the jeans. Set it aside.
Step 2: Determine Your Bag Size & Cut Main Pieces Decide how large you want your bag to be. The image shows a medium-sized shoulder bag.
From your flattened denim, cut two identical rectangles for the main bag body. For a similar look, aim for something around 12-14 inches wide by 10-12 inches tall. Add a 1/2 inch seam allowance all around.
If using interfacing, cut two pieces the same size as your main bag body pieces. Fuse them to the wrong side of your denim pieces following the manufacturer's instructions.
From your lining fabric, cut two identical rectangles the same size as your main bag body pieces.
Optional - Bottom Gusset: For a wider bag bottom, cut a rectangular piece of denim for the gusset (e.g., 12 inches long by 3-4 inches wide, plus seam allowance). Cut a matching piece from lining fabric and interfacing (if using).
Step 3: Cut Your Strap Pieces You have a few options here:
Denim Strap: Cut one long strip of denim from the remaining fabric, about 4-5 inches wide and as long as you need your strap to be (around 40-50 inches for a shoulder bag). Fold it in half lengthwise, press, and stitch the raw edges together, then turn right side out. Topstitch for a professional finish.
Upcycled Waistband Strap: This is my favorite for an authentic denim look! If you unpicked the waistband, simply use this as your strap. You might need to extend it by attaching a denim strip to each end if it's not long enough.
Fabric Strap: Cut two long strips of your lining fabric (or a contrasting fabric) and sew them together, turn, and press.
The Star of the Show: Denim Flowers!
This is where the magic happens! You'll need a good number of these, so start cutting!

Step 4: Making Your Denim Flower Petals
From your remaining denim scraps, cut circles. You'll need 5 circles per flower.
Tip: Vary the size of your circles slightly for different sized flowers, but generally aim for circles about 2.5 - 3.5 inches in diameter. You can use a glass or a jar lid as a template.
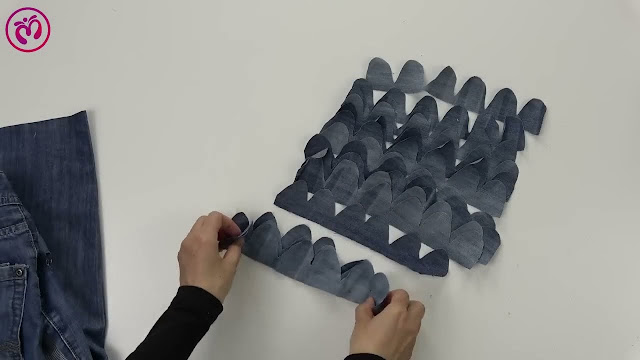
Take one denim circle. Fold it in half. Then fold it in half again to form a quarter circle.
Using your needle and thread (single strand), make a running stitch along the curved raw edge of the quarter circle. Don't knot the thread at the start.
Repeat for all 5 circles for one flower.
Step 5: Assembling Your Denim Flowers
Once you have all 5 "petals" (folded and stitched quarter circles) threaded onto one continuous piece of thread, gently pull the thread to gather the fabric.
Arrange the gathered petals into a flower shape. Overlap them slightly if needed.
Carefully tie off the thread securely, pulling it tight to form the flower.
Embellish: Hand-sew a pearl or bead securely to the center of each flower.
Step 6: Repeat, Repeat, Repeat! Make as many flowers as you need to cover one side of your bag, plus a few extra for embellishment on the strap or other side if desired. The image shows a dense covering on the front.
Constructing Your Bag
Step 7: Attach Flowers to Front Bag Panel
Lay one of your main denim bag body pieces right side up. This will be the front of your bag.
Arrange your finished denim flowers onto this panel, playing with placement until you're happy. The image shows them quite close together, creating a textured surface.
Once satisfied with the arrangement, carefully hand-sew or machine-stitch each flower securely to the denim panel. Stitch around the center base of each flower, making sure your stitches don't show too much on the right side.
Step 8: Assemble the Main Bag Body
Place the two main denim bag body pieces right sides together.
If you're adding a bottom gusset, sew the gusset piece to the bottom edge of one bag piece, then to the other. This creates a boxy bottom.
Otherwise, simply sew the side seams and the bottom seam using a 1/2 inch seam allowance. Leave the top open.
Optional - Boxed Corners: To create a flat bottom even without a gusset, "box" your corners. At each bottom corner, match the side seam with the bottom seam, creating a triangle. Stitch across the triangle, 1-2 inches in from the point (the further in you stitch, the wider the base). Trim the excess.

Step 9: Prepare and Attach the Lining
Repeat Step 8 for your lining pieces, but leave a 4-5 inch opening along the bottom seam of the lining. This will be used for turning the bag right side out.
With your denim bag shell still inside out, slide the lining bag (right side out) into the denim bag. The right sides of the denim and lining should be facing each other.
Align the top raw edges of the denim and lining. Pin all around.
Attach your strap now if you're not using D-rings. Insert the ends of your strap between the denim and lining layers at the side seams (or where you want them placed), raw edges aligned with the top edge. Pin securely.
Stitch around the entire top edge of the bag (denim and lining) with a 1/2 inch seam allowance, backstitching over the strap ends if you've inserted them.
Step 10: Finishing Touches
Through the opening in the lining, carefully pull the entire bag right side out.
Push out all corners and edges.
Hand-stitch the opening in the lining closed using a ladder stitch for an invisible finish.
Push the lining down into the denim bag.
Press the top edge of the bag. Topstitch all around the top edge for a crisp finish and to secure the lining.
Optional: Add a magnetic snap closure, a zipper pocket to the lining, or even some decorative rivets!
Flaunt Your Floral Denim Creation!
And there you have it! Your very own unique, upcycled denim flower bag. This piece isn't just a bag; it's a testament to your creativity and a fantastic way to give beloved denim a second life. Wear it with pride, knowing you made something truly special with your own hands.
Happy sewing, and don't forget to share your creations!

No comments:
Post a Comment