Looking for that perfect everyday bag that's both stylish and super functional? Look no further! This DIY canvas messenger bag offers ample storage, a secure flap closure, and two handy front pockets for quick access to your essentials. Whether you're a student, a commuter, or simply love a practical hands-free bag, this project is for you.

Let's gather our supplies and stitch up a bag that perfectly suits your needs!
Skill Level: Intermediate (familiarity with zippers and precise sewing is helpful)

Materials You'll Need:
Exterior Fabric (Durable Canvas/Duck Cloth): 1 yard (0.9 meters) of 44-inch wide fabric (like the olive green in the image).
Lining Fabric (Cotton/Quilting Cotton): 1 yard (0.9 meters) of 44-inch wide fabric.
Medium-Weight Fusible Interfacing: 1 yard (0.9 meters) of 20-inch wide interfacing (Pellon SF101 or similar).
Heavy-Weight Fusible Interfacing (Optional, for extra structure): 1/2 yard (0.45 meters) for the flap and bottom.
Zipper: 12-inch (30 cm) dress zipper for the main compartment.
Magnetic Snap Closure: 1 set (for the flap).
Hardware for Adjustable Strap:
2 D-rings (1-inch/2.5 cm or 1.5-inch/3.8 cm, matching strap width)
1 Slider buckle (matching D-ring width)
Coordinating all-purpose thread.
Sewing machine with a heavy-duty needle (e.g., denim or 90/14).
Fabric scissors.
Pins or fabric clips.
Measuring tape or ruler.
Fabric marker or chalk.
Iron and ironing board.
Optional: "Handmade" leather tags (as seen in image) or fabric labels.
Finished Bag Dimensions (Approximate): Height: 9-10 inches (23-25 cm) Width: 12-13 inches (30.5-33 cm) Depth: 3-4 inches (7.5-10 cm)
Cutting Your Fabric Pieces:
All seam allowances are 3/8 inch (1 cm) unless otherwise stated.
From Exterior Fabric:
Main Body (2 pieces): 14 inches (35.5 cm) wide x 11 inches (28 cm) high
Side/Bottom Panel (1 piece): 40 inches (101.5 cm) long x 4.5 inches (11.5 cm) wide
Flap (1 piece): 14 inches (35.5 cm) wide x 9 inches (23 cm) high
Front Pockets (2 pieces): 7 inches (18 cm) wide x 6 inches (15 cm) high
Strap (1 piece): 55 inches (140 cm) long x 3 inches (7.5 cm) wide
Strap Tabs (2 pieces): 4 inches (10 cm) long x 2 inches (5 cm) wide

From Lining Fabric:
Main Body Lining (2 pieces): 14 inches (35.5 cm) wide x 11 inches (28 cm) high
Side/Bottom Panel Lining (1 piece): 40 inches (101.5 cm) long x 4.5 inches (11.5 cm) wide
Flap Lining (1 piece): 14 inches (35.5 cm) wide x 9 inches (23 cm) high
Zipper Tabs (2 pieces): 2 inches (5 cm) wide x 2 inches (5 cm) high (Optional, if you want to finish zipper ends)
From Medium-Weight Fusible Interfacing:
Main Body (2 pieces): Cut to match Exterior Main Body pieces.
Side/Bottom Panel (1 piece): Cut to match Exterior Side/Bottom Panel.
Flap (1 piece): Cut to match Flap.
Front Pockets (2 pieces): Cut to match Front Pockets.
Strap (1 piece): Cut to match Strap.
Strap Tabs (2 pieces): Cut to match Strap Tabs.
From Heavy-Weight Fusible Interfacing (Optional):
Flap (1 piece): Cut 13.5 inches (34 cm) wide x 8.5 inches (21.5 cm) high (slightly smaller than flap).
Bottom Panel (1 piece): Cut 13 inches (33 cm) long x 3.5 inches (9 cm) wide (slightly smaller than side/bottom panel for the bottom section only).
Sewing Instructions:
Part 1: Prepare Interfacing & Pockets
Fuse Interfacing: Following the manufacturer's instructions, fuse all medium-weight interfacing pieces to the wrong side of their corresponding exterior fabric pieces. If using heavy-weight interfacing, fuse it to the flap and the bottom section of the side/bottom panel after the medium-weight interfacing.
Prepare Front Pockets:
For each Front Pocket piece, fold the top edge under 1/4 inch (0.6 cm), then again 1/2 inch (1.25 cm). Stitch to hem.
Fold the remaining three edges under 1/2 inch (1.25 cm) and press.
(Optional: Attach your "Handmade" tag to one or both pockets at this stage, centering it.)

Part 2: Assemble the Exterior Bag
Attach Front Pockets:
Take one Main Body Exterior piece (this is your front panel).
Position the two prepared Front Pockets onto the front panel. Place them about 2 inches (5 cm) from the bottom edge and 1 inch (2.5 cm) from the side edges, with a 1-inch (2.5 cm) gap between them. Pin securely.
Topstitch very close to the edge along the sides and bottom of each pocket to attach them to the front panel. Backstitch securely at the top corners of the pockets for reinforcement.
Attach Side/Bottom Panel:
Take your two Main Body Exterior pieces and the Side/Bottom Panel.
Starting at the bottom center of one Main Body piece, pin the Side/Bottom Panel all around the three sides (bottom and two sides), matching raw edges. Ease around the corners to create smooth curves.
Sew slowly with a 3/8 inch (1 cm) seam allowance, easing the fabric around corners. Clip the seam allowance at curves as needed to prevent bulk.
Repeat with the second Main Body piece, attaching the other long edge of the Side/Bottom Panel to it. You now have a 3D bag "box." Set aside.
Part 3: Assemble the Bag Lining
Assemble Lining Body: Repeat Part 2, Step 2 using your Lining Fabric pieces to create a 3D lining bag "box."
Prepare for Zipper:
On one of the Main Body Lining pieces, mark the center top edge.
Fold down the top edge of both Main Body Lining pieces by 1/2 inch (1.25 cm) and press. This will create a clean finish for the zipper.
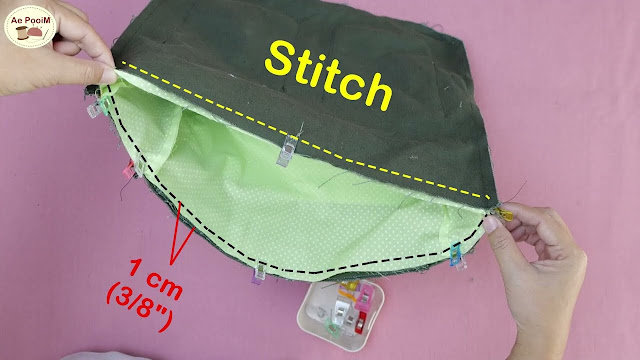
Part 4: Create the Flap
Take the Exterior Flap piece and the Flap Lining piece.
Place them right sides together.
Round the bottom two corners of the flap, or create a specific shape you desire (as seen in the image, a subtle curve or gentle angle).
Sew around the three outer edges (the two sides and the shaped bottom edge) with a 3/8 inch (1 cm) seam allowance, leaving the top straight edge open.
Clip curves and corners. Turn the flap right side out. Push out corners neatly. Press firmly.
Topstitch around the three sewn edges for a crisp finish and added durability.
Attach Magnetic Snap (Female part): Center the female (top) part of your magnetic snap onto the wrong side of the flap (the lining side), about 1 inch (2.5 cm) up from the finished bottom edge. Following the snap instructions, attach it securely.
Part 5: Construct the Strap & Attach Hardware
Strap:
Take your Strap piece. Fold it in half lengthwise, right sides together. Press.
Sew along the long raw edge with a 3/8 inch (1 cm) seam.
Turn the strap right side out. Press flat, making sure the seam is centered along the back.
Topstitch along both long edges of the strap for durability and a finished look.
Strap Tabs:
Take a Strap Tab piece. Fold it in half lengthwise (2" x 2"), wrong sides together, and press. Open.
Fold each long edge to the center crease, then fold in half again. You'll have a 1/2 inch (1.25 cm) wide tab. Topstitch along both long edges. Repeat for the second tab.
Thread one prepared tab through a D-ring. Fold the tab in half so the D-ring is at the folded end. Pin the raw ends together.
Repeat for the second tab and D-ring.
Attach Hardware to Strap:
Take one end of your main Strap. Thread it through the slider buckle, going over the middle bar and then back under. Leave a tail of about 2 inches (5 cm).
Take a D-ring (with its tab) and thread the tail of the strap through it. Fold the tail back onto itself and stitch it down securely with a box stitch or multiple lines of stitching.
Take the other end of your main Strap. Thread it through the remaining D-ring. Fold the raw end under 1/2 inch (1.25 cm), then thread it through the other side of the slider buckle (the open side). Adjust the strap to your desired length.
(Alternatively, if you want a fixed-length strap, just attach D-rings to the bag and attach the strap ends directly to the D-rings after folding and topstitching.)
Part 6: Install the Zipper
Prepare Zipper: If using zipper tabs, sew them to the ends of your 12-inch zipper. This will make it easier to attach.
Attach to Lining:
With the lining bag wrong side out, open up the top raw edge.
Pin one side of the zipper (right side down) to the top raw edge of one Main Body Lining panel, centering it. The zipper teeth should face down.
Sew the zipper to the lining panel using a zipper foot, stitching as close to the teeth as possible.
Repeat for the other side of the zipper and the other Main Body Lining panel.
Once attached, you should be able to zip the top of your lining bag closed.
Part 7: Final Assembly
Attach D-Ring Tabs to Exterior Bag:
Take your exterior bag (right side out).
Locate the top corners where the side panel meets the main body.
Pin the raw ends of the D-ring tabs (with D-rings attached) to the top raw edge of the bag, centering them over the side seams. The D-rings should face inwards. Baste in place.
Attach Flap to Exterior Bag:
With the exterior bag right side out, find the back panel.
Position the prepared flap (with snap attached) onto the back panel, centering it along the top raw edge. The right side of the flap should be facing the wrong side of the bag. Pin in place.
Baste the flap to the bag body within the seam allowance.
Insert Lining into Exterior Bag:
With the main exterior bag right side out, insert it into the lining bag (which should be wrong side out, with the zipper partially open). The right sides of the exterior bag and the lining should be facing each other.
Align the top raw edges of the bag and lining, matching side seams and D-ring tab placement. Pin all around the top opening.
Sew all around the top raw edge with a 3/8 inch (1 cm) seam allowance, leaving a 4-5 inch (10-12.5 cm) opening along the back edge (away from the zipper/flap attachment) for turning.
Turn & Finish:
Pull the entire bag right side out through the turning hole.
Push out all corners and edges neatly. Gently tug on the D-rings to ensure they are fully exposed.
Press the top edge of the bag firmly, ensuring the seam allowance of the turning hole is tucked inwards.
Stitch the turning hole closed by hand using a ladder stitch, or by machine with a topstitch very close to the edge.
Topstitch around the entire top opening of the bag for a crisp finish and to further secure the lining.
Attach Magnetic Snap (Male part):
Close the bag flap and find where the female snap meets the front of the bag. Mark this spot.
Attach the male (bottom) part of the magnetic snap to the front exterior panel of the bag, following the manufacturer's instructions.
Attach Strap: Clip the swivel hooks of your prepared strap to the D-rings on the bag.
You're Done!
You've successfully created a fantastic, versatile canvas messenger bag! It's the perfect blend of style and practicality, ready for all your daily adventures.
Share your finished messenger bag with me on social media using #DIYMessengerBag – I can't wait to see your fabric choices! Happy sewing!

No comments:
Post a Comment