
Ready to breathe new life into your old denim? This spacious and stylish tote bag combines the rugged durability of jeans with a unique gathered top that cinches closed with a simple drawstring, which also acts as your handle! Featuring a classic repurposed jeans pocket on the front, this project is not only eco-friendly but also results in a distinctive and incredibly functional bag you'll love to carry.
Let's grab those jeans and stitch up some creative comfort!
Skill Level: Intermediate (due to shaping the top opening and creating the drawstring casing)

Materials You'll Need:
Denim Fabric: 1 pair of adult-sized jeans (straight leg or relaxed fit works best for fabric yield) or equivalent denim scraps.
Lining Fabric: 1 yard (0.9 meters) of 44-inch wide cotton quilting fabric or a durable fabric of your choice.
Drawstring/Handle Material: 3-4 yards (2.7-3.6 meters) of sturdy cord, thick ribbon, or thin webbing (e.g., cotton cording, parachute cord, or flat shoelace-style cording, like the white in the image).
Medium-Weight Fusible Interfacing (Optional, but recommended for body): 1 yard (0.9 meters) of 20-inch wide interfacing (Pellon SF101 or similar).
Coordinating all-purpose thread.
Sewing machine with a denim needle (essential!).
Fabric scissors.
Pins or fabric clips.
Measuring tape or ruler.
Fabric marker or chalk.
Iron and ironing board.
Large safety pin or bodkin (for threading drawstring).
Finished Bag Dimensions (Approximate, when flat and uncinched): Height (excluding drawstring): 13-14 inches (33-35.5 cm) Width: 16-18 inches (40.5-45.5 cm) Depth (bottom): 5-6 inches (12.5-15 cm)
Preparation: Deconstructing Your Jeans
Wash and Dry: Wash and dry your jeans. This preshrinks the fabric and ensures it's clean.
Cut Off Legs: Lay the jeans flat. Cut off both legs straight across, about 1-2 inches (2.5-5 cm) below the crotch seam. Set the top portion (waistband, fly, and pockets) aside – we'll use a back pocket!
Open Leg Seams: Cut along the inner seam of both jean legs, opening them up into flat pieces of fabric. Press them flat with an iron.
Harvest Pocket: Carefully unpick one of the back pockets from the top portion of the jeans. Try to keep it intact as much as possible. This will be your exterior pocket on the bag.
Cutting Your Fabric Pieces:
All seam allowances are 3/8 inch (1 cm) unless otherwise stated.
From Denim Fabric:
Main Body Exterior (2 pieces): Cut two rectangles measuring 16 inches (40.5 cm) wide x 15 inches (38 cm) high.
Side/Bottom Panel (1 piece): Cut one long rectangle measuring 39 inches (99 cm) long x 6 inches (15 cm) wide.
From Lining Fabric:
Main Body Lining (2 pieces): Cut two rectangles measuring 16 inches (40.5 cm) wide x 15 inches (38 cm) high.
Side/Bottom Panel Lining (1 piece): Cut one long rectangle measuring 39 inches (99 cm) long x 6 inches (15 cm) wide.
From Medium-Weight Fusible Interfacing (if using):
Main Body Interfacing (2 pieces): Cut to match Main Body Exterior pieces.
Side/Bottom Panel Interfacing (1 piece): Cut to match Side/Bottom Panel.
Sewing Instructions:
Part 1: Prepare Main Body Panels & Pocket
Fuse Interfacing (if using): Following the manufacturer's instructions, fuse all medium-weight interfacing pieces to the wrong side of their corresponding denim Main Body Exterior and Side/Bottom Panel pieces.
Attach Front Pocket:
Take one of your Main Body Exterior denim pieces. This will be the front of your bag.
Center your harvested back pocket onto this panel, about 5-6 inches (12.5-15 cm) up from the bottom edge and centered horizontally. Pin securely.
Topstitch carefully around the three sides of the pocket (leaving the top open) to secure it to the main body panel. Use a denim needle and a slightly longer stitch length (3.0-3.5mm) for a strong, decorative stitch.

Part 2: Assemble the Outer Bag Body
Take your two Main Body Exterior denim pieces. Place them right sides together.
Take your denim Side/Bottom Panel.
Starting at the bottom center of one Main Body piece, pin the Side/Bottom Panel all around the three sides (bottom and two sides), matching raw edges. Ease gently around the corners to create smooth curves. Pin frequently.
Sew slowly with a 3/8 inch (1 cm) seam allowance, easing the fabric around corners. Clip the seam allowance at curves as needed to reduce bulk.
Repeat with the second Main Body piece, attaching the other long edge of the Side/Bottom Panel to it. You now have a 3D bag "box." Leave the top raw edge open.
Turn the denim outer bag right side out. Set aside.
Part 3: Assemble the Bag Lining
Repeat all steps in Part 2 entirely using your Lining Fabric pieces (Main Body Lining and Side/Bottom Panel Lining).
Important: Do NOT turn the lining right side out. Leave it wrong side out.

Part 4: Shape the Top Opening & Attach Lining
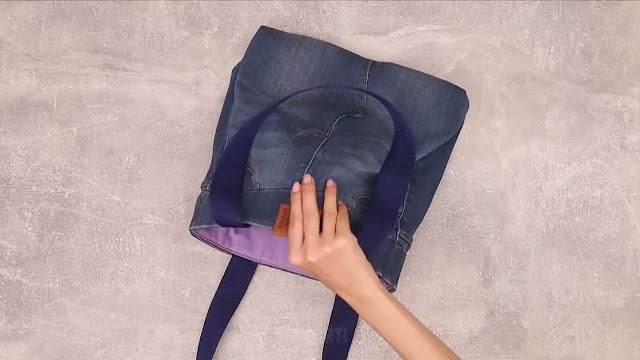
Shape the Hand-Hole (The Key Feature!):
Lay your outer denim bag flat with the front pocket facing up.
Measure 3.5 inches (9 cm) down from the top raw edge at the center of the bag's front panel. Mark this point.
From this center point, draw a smooth, wide U-shape or a semi-circle that curves up towards the top raw edge, leaving about 2-3 inches (5-7.5 cm) of fabric at the top corners and along the side seams. This creates the opening for your hand. (See image for visual guide).
Carefully cut along this marked line through both the front and back panels of your outer denim bag.
Repeat this exact same shaping for your lining bag.
Join Outer and Lining:
With the outer denim bag right side out, slip it inside the lining bag (which is still wrong side out). The right sides of the denim bag and the lining should be facing each other.
Align the top raw edges of the outer bag and the lining, matching side seams and the newly cut U-shaped curves. Pin all around the entire top opening.
Sew all around the top raw edge with a 3/8 inch (1 cm) seam allowance, leaving a 4-5 inch (10-12.5 cm) opening along one of the flat straight sections (not the curved part) for turning. Backstitch at the beginning and end of this opening.
Part 5: Create Drawstring Casing & Finish
Turn Right Side Out: Reach into the turning hole and gently pull the entire bag right side out.
Push and Press: Push out all corners and curves neatly. Press the entire top edge of the bag firmly, ensuring the seam allowance of the turning hole is tucked inwards.
Form Drawstring Casing:
Topstitch around the entire top opening of the bag (about 1/8 inch or 0.3 cm from the edge) to secure the lining and give a crisp finish.
Now, measure 1 inch (2.5 cm) down from this first topstitch line. Draw a parallel line with your fabric marker.
Stitch along this second line all around the entire top opening, forming a channel or casing for your drawstring. Ensure this stitching line follows the curve of your hand-hole opening.
You will need to leave a small opening (about 1 inch / 2.5 cm) in this second stitching line, preferably somewhere on the back panel, so you can thread your drawstring through. Backstitch on either side of this opening.
Thread Drawstring/Handle:
Attach a large safety pin or bodkin to one end of your drawstring material.
Thread the drawstring through the opening you left in the casing, guiding it all the way around the entire bag until it emerges from the same opening.
Tie the two ends of the drawstring together in a secure knot.
Final Press: Give your entire bag a final press to smooth out any wrinkles.
You're Done!
Congratulations! You've just created a fantastic, one-of-a-kind upcycled denim tote bag with a charming cinched top and integrated handles. It's spacious, stylish, and a testament to your creative sewing skills. Cinch it closed for security, or leave it open for a relaxed tote vibe.
Fill it up with your daily essentials, your latest project, or your farmers' market haul! Share your drawstring tote creations with me on social media using #CinchAndCarryTote – I'd love to see your unique fabric combinations! Happy sewing!


No comments:
Post a Comment