Looking for a sewing project that's a little out of the ordinary, but still totally practical and stylish? Look no further! This ingenious bag design, made from a single "H-shaped" piece of denim, transforms old jeans into a truly unique shoulder bag with an integrated handle and a top zipper. It's a fantastic way to upcycle and add a handmade touch to your accessories.

This tutorial will guide you through the process of cutting and sewing this clever bag, perfect for carrying your essentials with a distinctive flair. Get ready to turn heads with your eco-friendly fashion statement!
Why You'll Love This Project:
Distinctive Design: The "H" shape creates a truly unique and modern bag silhouette.
Eco-Friendly: Gives old jeans a fantastic new purpose, reducing textile waste.
Budget-Friendly: Creates a stylish bag without buying new fabric.
Integrated Handle: No need to sew separate straps – it's all part of the main piece!
Intermediate Challenge: A rewarding project to practice curved seams and zipper installation.
What You'll Need:
1-2 Pairs of Old Denim Jeans: You'll need a large, flat piece of denim for the "H" shape. Larger jeans or those with wider legs will work best.
Sewing Machine: With a denim needle (essential for stitching through thick fabric!).
Strong Polyester Thread: Matching your denim or a contrasting color for topstitching (e.g., gold or orange).
Fabric Scissors: Sharp and sturdy.
Measuring Tape or Ruler.
Fabric Chalk or Washable Marker.
Pins or Wonder Clips: Clips are excellent for holding thick denim layers.
Iron and Ironing Board.
Seam Ripper.
Zipper: A plastic or metal zipper, about 10-14 inches (25-35 cm) long, depending on your desired bag size.
Optional: Lightweight fusible interfacing for added structure (especially for the handle and zipper area).
Step-by-Step Pattern & Sewing Guide:
Step 1: Prepare Your Denim
Deconstruct Jeans: Lay your jeans flat. Use your seam ripper to carefully open up both the inner and outer leg seams of one pant leg. If one leg isn't wide enough, you might need to carefully unpick the side seam of the other leg to piece them together for a wider section.
Press Flat: Press the denim piece(s) flat to remove any creases. You want the largest, flattest possible rectangle of denim.

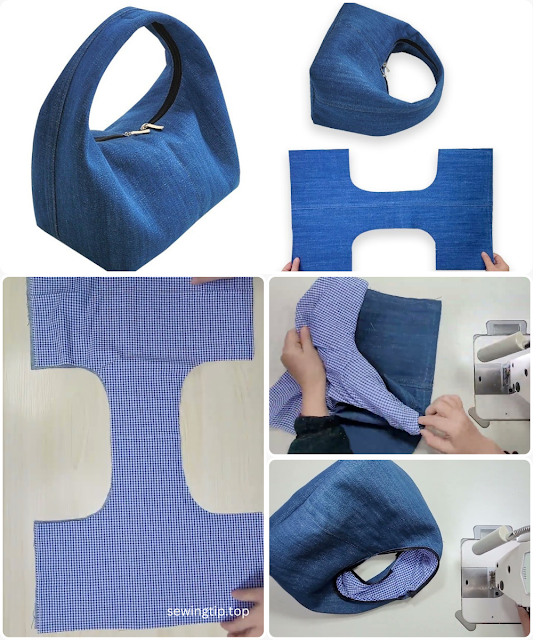
Step 2: Create the "H" Pattern Piece
This is the most crucial step! The proportions of your "H" will determine the final bag size and shape.
Determine Bag Dimensions:
Total "H" Length (A): This will be the overall length of your flattened "H" piece. Let's say you want your bag to be roughly 10-12 inches (25-30 cm) tall when finished. Your "H" length will be related to this, plus seam allowances.
Total "H" Width (B): This will be the overall width of your flattened "H" piece. Let's say you want your bag to be roughly 12-14 inches (30-35 cm) wide at its base.
Center "Bar" Width (C): This forms the bottom of your bag and the base of the handle. This should be roughly 4-6 inches (10-15 cm) wide.
Outer "Leg" Width (D): The width of the two outer "legs" of the H.
D = (B - C) / 2.
Draw the "H" on Denim:
On the wrong side of your largest denim piece, draw a large rectangle with dimensions
A(length) byB(width).Measure in from each
Bside byDand mark lines. This leaves theCwidth in the center.Now, along the
Alength, mark where the "cut-outs" for the handle and bag opening will start and end. These cut-outs will be along theCwidth. The remaining parts of theAlength will form the integrated handle (at the top) and the bottom of the bag.Carefully draw the curved "indentations" on both long sides of the
Csection, creating the "H" shape. The image shows relatively deep, smooth curves.Add Seam Allowance: Add a consistent 1/2 inch (1.25 cm) seam allowance all around your entire "H" shape.
Cut: Carefully cut out your "H" shaped denim piece.

Step 3: Prepare the Zipper Opening
Mark Zipper Placement: The zipper will be installed along the top edge of the "H" where the two upper "legs" meet.
Prepare Edges: Along this top curved edge, you can either:
Fold the raw edge under twice (e.g., 1/4 inch then 1/4 inch) and press.
Or, cut a thin strip of denim (e.g., 1.5 inches wide) to use as a zipper facing. Fold it in half lengthwise and press.
Fuse Interfacing (Optional): If using, fuse lightweight interfacing to the wrong side of the zipper edge section for stability.
Step 4: Attach the Zipper
Align Zipper: Place your zipper face down along one of the prepared top edges of the "H" (right side of denim). Align the zipper tape edge with the fabric edge. Pin securely.
Stitch: Using your sewing machine's zipper foot, stitch the zipper in place.
Repeat: Repeat for the other side of the zipper, attaching it to the opposing top edge of the "H" piece.
Topstitch: Topstitch on either side of the zipper, parallel to the zipper teeth, for a clean and durable finish.

Step 5: Form the Bag Body
Fold and Pin: With the zipper now installed, fold your "H" shaped piece in half so the two "legs" of the H (what will become the sides of the bag) meet, right sides together. The zipper should be at the top, and the handle cut-out should align.
Sew Side Seams: Pin along the long side seams of the bag. Stitch these seams with a 1/2 inch (1.25 cm) seam allowance.
Sew Bottom Seams: Now, you'll close off the bottom. Fold the bag so the raw edges of the bottom "legs" of the H align. Stitch these bottom seams.
Shape the Corners (Optional, for a boxier bottom): To give the bag a flatter bottom, you can "box" the corners. At each bottom corner, pinch the seam you just sewed so it aligns with the side seam (creating a triangle). Stitch across the triangle, about 1-2 inches (2.5-5 cm) from the corner. Trim the excess fabric.
Step 6: Finish the Handle and Remaining Openings
Handle Opening: The cut-out portion of the "H" that forms the handle now needs finishing. You can:
Fold the raw edges under twice (1/4 inch then 1/4 inch) and topstitch.
Or, use denim bias tape to bind the raw edges for a neat finish.
Armhole of Bag (the other "H" cut-out): Repeat the same finishing method (double fold and topstitch or bias binding) for the larger "armhole" cut-outs of the "H" shape. This forms the side opening of the bag.
Your Unique "H" Bag is Ready!
Congratulations! You've successfully sewn a truly distinctive and functional denim shoulder bag from old jeans. This project showcases creativity and upcycling at its best. Fill it with your essentials and enjoy carrying a piece that's uniquely yours!
Share your amazing "H" bag creations with us in the comments or on social media! Happy sewing!

No comments:
Post a Comment