Dreaming of a pair of comfortable, stylish shorts perfect for warm days? Look no further! These high-waisted shorts with a charming ruffled elastic waistband are not only on-trend but also incredibly easy to sew. Whether you're lounging at home, heading to the beach, or enjoying a casual outing, these shorts will be your new go-to.
This tutorial will guide you through creating these delightful shorts from a simple fabric piece, focusing on that lovely ruffled waistband detail.
Why You'll Love This Project:
Ultimate Comfort: The elastic waistband makes them incredibly comfy and easy to wear.
Stylish & Trendy: The high waist and ruffled detail are very fashionable.
Beginner-Friendly: A straightforward project with simple shapes and techniques.
Versatile: Perfect for various fabrics – lightweight cottons, linen blends, or even rayon for a flowy look.
Custom Fit: Easily adjustable to your waist and preferred length.

What You'll Need:
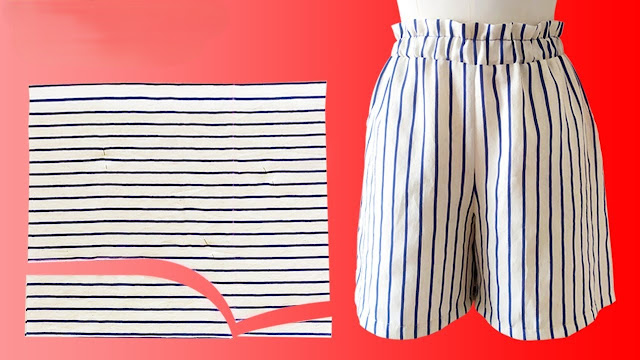
Fabric: About 1 - 1.5 yards (1 - 1.5 meters) of lightweight woven fabric. Cotton lawn, linen, rayon, chambray, or a soft cotton blend are excellent choices. (The image shows a lovely striped fabric!). Make sure it's wide enough for your shorts (typically 44-60 inches wide).
Elastic: Non-roll elastic, 1 inch (2.5 cm) wide. You'll need a piece equal to your waist measurement, plus an inch or two for overlap.
Sewing Machine: With a universal needle.
Matching Polyester Thread.
Fabric Scissors.
Measuring Tape or Ruler.
Fabric Chalk or Washable Marker.
Pins.
Iron and Ironing Board.
Safety Pin or Bodkin: For threading elastic.
A pair of well-fitting shorts or pants (optional): To use as a guide for tracing your crotch curve.
Step-by-Step Pattern & Sewing Guide:
Step 1: Prepare Your Fabric & Cut Pieces
Prepare Fabric: Pre-wash and dry your fabric to prevent shrinkage later. Press it smooth.
Fold Fabric: Fold your fabric in half lengthwise (selvage to selvage), then fold it again widthwise. You should have 4 layers of fabric. This allows you to cut both front and back pieces simultaneously.
Determine Shorts Dimensions:
Desired Shorts Length: Measure from your natural waist down to where you want your shorts to fall. Add 1 inch (2.5 cm) for the hem allowance.
Waistband Height (for ruffle): Decide how tall you want your ruffled waistband to be. A good starting point is 2 inches (5 cm) for the finished ruffle. Since it will be folded over for the elastic casing, you'll need at least
(Ruffle Height * 2) + Elastic Width + Seam Allowance. For a 1" elastic and a 2" ruffle, this might be(2*2) + 1 + 0.5 = 5.5 inchesor more.Hip/Width: To get enough fabric for gathering, your fabric width (before cutting the crotch) should be roughly 1.5 to 2 times your hip measurement. If your fabric is 45" wide, and you fold it twice, each piece will be about 22" wide, which should be good for most.
Cut the Shorts Pieces:
Rough Rectangle: Start by cutting a large rectangle from your folded fabric. The height of this rectangle should be
Desired Shorts Length + Waistband Height Allowance. The width should be generous enough for your hips (e.g., half of your total hip circumference plus ample ease for gathers).Draw the Crotch Curve: Lay your pre-existing shorts or pants on top of your fabric rectangle. Align the top edges. Trace the inner leg seam and crotch curve onto your fabric using chalk, ensuring you add a 1/2 inch (1.25 cm) seam allowance outside your traced line. The image shows a relatively gentle curve.
Cut: Cut out your shorts pieces. You should have two identical pieces that will become the front and back of your shorts.

Step 2: Sew the Shorts
Sew Crotch Seams: Take your two shorts pieces. Place them right sides together, aligning the long, curved crotch seams ("U" shaped part). Pin them together.
Stitch: Stitch along both crotch curves with a 1/2 inch (1.25 cm) seam allowance. Press seams open or to one side. Finish the raw edges with a zigzag stitch or serger to prevent fraying.
Sew Inner Leg Seam: Now, open up one of your sewn shorts pieces. Lay it flat so the two crotch seams you just sewed are now facing each other. This creates the inner leg seam. Pin the entire length of this seam.
Stitch: Stitch this long inner leg seam with a 1/2 inch (1.25 cm) seam allowance. Press seam open and finish raw edges. Your shorts should now look like a complete, albeit unhemmed, pair!

Step 3: Create the Ruffled Elastic Waistband
Prepare Top Edge: At the top raw edge of your shorts, fold down 1/4 inch (0.6 cm) towards the wrong side and press.
Fold for Casing: Fold down again by your full waistband allowance (e.g., 5.5 inches if using our example), so the raw edge is completely encased, and the fold forms the top edge of your ruffle. Press well.
Stitch the Casing: Stitch around the bottom edge of this wide folded casing, leaving a 1-2 inch (2.5-5 cm) gap open at the back or front of the waistband. This gap is where you'll thread your elastic through. Make sure your stitching creates a channel for your 1-inch elastic plus extra room above it for the ruffle. You might need two rows of stitching to create the elastic channel and hold down the ruffle. (e.g., one row 1.25 inches from the top, and another row at the very bottom edge of the casing).

Step 4: Insert Elastic
Cut Elastic: Cut a piece of 1-inch wide elastic to your comfortable waist measurement.
Thread Elastic: Attach a safety pin or bodkin to one end of your elastic. Carefully thread the elastic through the opening you left in the waistband casing. Guide it all the way around until it emerges from the same opening. Be careful not to twist the elastic inside the casing.
Secure Elastic: Overlap the two ends of the elastic by 1 inch (2.5 cm) and stitch them together securely with a zigzag stitch.
Close Opening: Stitch the remaining opening in the waistband casing closed.
Even Gathers: Gently pull on the shorts to distribute the gathers evenly around the waistband. You can topstitch a few vertical lines through the casing to keep the elastic from twisting, if desired.
Step 5: Hem the Shorts
Try on the shorts: Put on your new shorts and check the length in a mirror.
Mark Hem: Mark your final desired hem length with chalk.
Hem: Fold the raw bottom edge of each leg up by 1/2 inch (1.25 cm) towards the wrong side and press. Fold up again by another 1/2 inch (1.25 cm) and press.
Stitch: Stitch the hem in place.
Your Stylish & Comfy Ruffled Shorts are Ready!
And just like that, you've sewn a delightful pair of high-waisted shorts with a charming ruffled waistband! These are perfect for sunny days, casual outings, or just lounging around in ultimate comfort.
Share your amazing shorts creations with us in the comments or on social media! Happy sewing!

No comments:
Post a Comment